How to Add Rain to a Photo with Photoshop

Step 1: Add a new blank layer above the image
To keep the rain effect separate from the original image, we’ll add the rain on its own layer.
Click the Add New Layer icon at the bottom of the Layers panel:

Clicking the Add New Layer
icon.
A new blank layer named Layer 1
appears above the Background layer:

The new layer is added.
Double-click on the name Layer 1
and rename it Rain
. Then press Enter (Win) / Return (Mac) on your keyboard to accept it:

Renaming the new layer.
Step 2: Fill the new layer with black
Fill the new layer with black by going up to the Edit menu in the Menu Bar and choosing Fill:

Going to Edit > Fill.
In the Fill dialog box, change the Contents to Black, and then click OK:

Changing the Contents option to Black.
Photoshop fills the layer with black, which temporarily hides the image below it from view:

The document after filling the “Rain” layer with black.
Step 3: Apply the Add Noise filter
Go up to the Filter menu, choose Noise, and then choose Add Noise:

Going to Filter > Noise > Add Noise.
The Add Noise filter adds random dots, or noise
, to the layer. And we’ll turn these dots into our raindrops.
Set the Amount value to 25% and choose Gaussian for the distribution. Limit the dot colors to black and white by selecting Monochromatic at the bottom. Then click OK to close the dialog box:

The Add Noise options.
Photoshop fills the layer with noise. The dots are too small at the moment, so we’ll fix that next:

The “Rain” layer after filling it with noise.
Step 4: Scale the noise by 400%
To make the dots bigger, go up to the Edit menu, choose Transform, and then choose Scale:

Going to Edit > Transform > Scale.
In the Options Bar, click the link icon between the Width (W) and Height (H) values:
Linking the Width and Height.
Change the Width to 400%. Since the Width and Height are linked together, Photoshop sets the Height to 400% to match:

Increasing the Width and Height to 400%.
Then click the checkmark in the Options Bar to accept it:

Clicking the checkmark.
And now the dots are much bigger:

The noise after scaling the width and height by 400%.
Related: How to scale, rotate, distort and more with Free Transform
Step 5: Crop away the hidden areas
The problem with making the contents of the Rain
layer so much bigger is that we’ve also made the document’s file size much bigger. And the added size could slow Photoshop’s performance to a crawl as we move through the remaining steps. So to reduce the file size, we need to crop away all the noise that now extends outside the canvas (the viewable area of the document) and into the gray pasteboard area surrounding it.
To do that, go up to the Select menu and choose All. A selection outline appears around the edges of the canvas:

Going to Select > All.
Go up to the Image menu and choose Crop:

Going to Image > Crop.
And then remove the selection outline by going back to the Select menu and choosing Deselect. Everything outside the canvas is now cropped away:

Going to Select > Deselect.
Related: My complete guide to cropping images in Photoshop
Step 6: Convert the Rain layer into a smart object
In a moment, we’ll turn the noise into falling rain using Photoshop’s Motion Blur filter. But to keep the filter settings editable, we’ll apply Motion Blur as a smart filter. And to do that, we first need to convert the Rain
layer into a smart object.
In the Layers panel, make sure the Rain
layer is selected. Then click the menu icon in the upper right of the panel:
Clicking the Layers panel menu icon.
And choose Convert to Smart Object from the menu:

Choosing Convert to Smart Object
.
An icon appears in the layer’s preview thumbnail, telling us that the layer is now inside a smart object:
The smart object icon.
Step 7: Change the Blend Mode to Screen
To blend the noise in with the image, change the blend mode of the Rain
smart object from Normal to Screen:
Changing the layer blend mode to Screen.
The Screen blend mode hides all areas of black, leaving only the white dots visible:

The effect after changing the blend mode to Screen.
Related: Learn Photoshop’s five essential blend modes
Step 8: Apply the Motion Blur filter
To turn the dots into falling rain, we’ll add motion to them using the Motion Blur filter.
Go up to the Filter menu, choose Blur, and then choose Motion Blur:

Going to Filter > Blur > Motion Blur.
In the Motion Blur dialog box, set the direction of the rain using the Angle value. You can enter a value directly or click and drag the dial to rotate it. I’ll set my angle to 65°.
Then set the Distance of the motion blur. Drag the slider along the bottom to change the value and preview the results in your image. I’ll set the distance to 75 pixels, but the value that works best for your image will depend on its size. Don’t worry about getting it exactly right for now because I’ll show you how to change the value later if needed.
Click OK when you’re done to close the dialog box:

The Motion Blur options.
And here’s the result with the motion blur applied:

The rain effect after applying a motion blur to the noise.
In the Layers panel, Motion Blur appears listed as a smart filter below the smart object. We’ll come back to this later:

Smart filters are listed below their smart object.
Step 9: Scale the Rain smart object to 110%
So far so good, except for one problem. The motion blur effect along the edges of the image, especially along the top and bottom, doesn’t look right.
It’s a bit hard to see in the screenshot, but if I zoom in on the top of my image, notice that the effect appears brighter just below the edge. The reason is that we cropped away all the noise outside the canvas, so the Motion Blur filter bumped up against the edge and had nowhere to go:

The edges were a problem for the Motion Blur filter.
The solution is to scale the noise just enough to move those problem areas outside the canvas.
With the Rain
smart object selected in the Layers panel, go back to the Edit menu, choose Transform, and once again choose Scale:
Going to Edit > Transform > Scale.
Photoshop warns that the Motion Blur smart filter will be disabled temporarily until the scaling is complete. Click OK to close the dialog box:

The warning that smart filters will be turned off temporarily.
In the Options Bar, set the Width (W) to 110%. With the link icon still selected, Photoshop changes the Height (H) to 110% automatically:

Scaling the width and height of the noise by 110 percent.
Then click the checkmark in the Options Bar to accept it:
Clicking the checkmark.
Photoshop turns the Motion Blur filter back on, and the edges are fixed:

The edges now look better after scaling the noise.
Step 10: Add a Levels adjustment layer
To reduce the amount of rain, and add some contrast to the effect, we’ll use a Levels adjustment layer.
In the Layers panel, click the New Fill or Adjustment Layer icon at the bottom:

Clicking the New Fill or Adjustment Layer icon.
And choose Levels from the list:

Adding a Levels adjustment layer.
A Levels adjustment layer appears above the Rain
smart object:

The Levels adjustment layer appears.
Step 11: Create a clipping mask
Then to limit the effect of the adjustment layer to just the Rain
smart object below it (so it doesn’t affect the original image as well), create a clipping mask by clicking the Layers panel menu icon:
Clicking the Layers panel menu icon.
And choosing Create Clipping Mask from the menu:

Clipping the adjustment layer to the smart object below it.
Step 12: Drag the Black and White Point sliders
The controls for the Levels adjustment layer appear in Photoshop’s Properties panel. And in the center of the panel is a histogram, a graph showing the tonal range of the image.
Below the histogram are three sliders. There’s a black point slider on the left, a white point slider on the right, and a midtones slider in the middle. To adjust the rain effect, we only need the black and white sliders:

The black point (left) and white point (right) sliders below the histogram.
First, to reduce the amount of rain, click on the black slider on the left and begin dragging it towards the right. As you drag, keep an eye on your image and you’ll see the darkest areas of rain growing darker, and eventually disappearing completely.
Then if you need to brighten the rain that’s still visible, click on the white slider and drag it towards the left, again while keeping an eye on your image.
You’ll probably need to go back and forth with the two sliders to find the settings that work best:

Adjusting the black and white sliders.
You can toggle the Levels adjustment layer on and off to compare the result with the original rain effect by clicking the adjustment layer’s visibility icon in the Layers panel:

Clicking the visibility icon for the Levels adjustment layer.
Here’s my rain effect after dragging the sliders. There’s now less rain overall, and the effect has more contrast:

The effect after enhancing the rain with Levels.
Step 13: Readjust the Motion Blur or Levels settings if needed
Finally, after moving the sliders, you may find that there’s no longer enough motion being applied to the rain. To adjust the motion blur amount, double-click on the Motion Blur smart filter in the Layers panel:

Double-clicking the Motion Blur smart filter.
This reopens the Motion Blur dialog box where you can increase (or decrease, if needed) the Distance value. In my case, I’ll increase it from 75 pixels to 150 pixels, but again it will depend on the size of your image. You can also adjust the Angle value while you’re here, but I’ll leave mine set to 65°. Click OK when you’re done to close the dialog box:

Adding more motion blur to the rain.
And if you need to edit the black point and white point sliders in the Levels adjustment layer, just click on the histogram icon to reselect the adjustment layer:

Reselecting the Levels adjustment layer.
Then in the Properties panel, drag the sliders as needed:

Making final adjustments to the amount and brightness of the rain.
And with that, we’re done! Here is my final Photoshop rain effect:
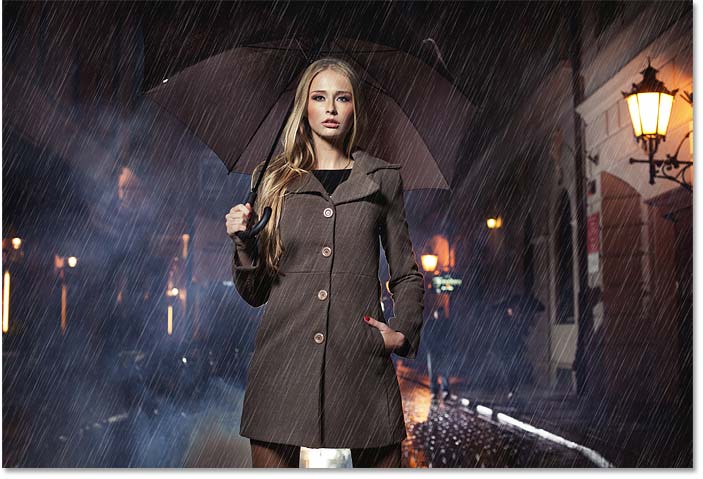
The final result.